Accessibility in Microsoft Office
Overview
Adapt these tips and tricks for setting up your digital content with accessibility in mind. This includes your documents (Microsoft Word), presentations (Microsoft PowerPoint), and spreadsheets (Microsoft Excel). Additional recommendations are included for making PDF’s accessible.
Review the Quick Reference guide after creating your documents as a form of testing.
Background
All digital content must meet UC Policy (IMT-1300) for WCAG 2.1 Level AA standards. The general process includes:
Format content
Run automatic testing, using built-in accessibility checkers
Conduct manual testing (especially for color-contrast and reading order)
Save as PDF
Upload metadata into PDF
Test using PAC checker, NVDA, or JAWS screenreaders
The recommendations on this webpage are not all inclusive. Learn more at the Training videos library by Section508.gov.
Documents
-
Setup your file with information about the document, known as “metadata.”
Go to “File” tab
Select “Info”
Add under “Title” field
-
Format each section with built-in styles. Avoid using the bold, italics, underline, or color tools to distinguish words.
Format headers
Enter headers for each opening paragraph
Select text
Go to “Home” tab
Select “Title,” “Heading 1,” or “Heading 2” under the Styles section
Header types
Title. There is only one title per document, usually at the top.
Header 1. Identify each major section as a Level 1 header. This style is called “Heading 1”
Heading 2. Format the minor sections as a Level 2 or 3 header. This style is called “Heading 2”
-
Styles
Use the “Normal text” style for the body section of your document. If you are borrowing from another document, try to copy and paste as text only (unformatted).
Webpages
Add links using descriptive text. This is generally the name of the webpage, and not its URL.
Write out page name
Select text
Press “Ctrl” and “K” on keyboard
Paste URL of webpage
For example, Google is a correct way to link to a website, while www.google.com is incorrect.
Paragraph spacing
Avoid pressing the “Enter” key twice to separate paragraphs. This creates empty paragraph containers which make it difficult for assistive devices. Instead, using paragraph spacing:
Enter text
Place cursor at the end of the last paragraph
Go to “Home” tab
Locate the Paragraph section
Drop down the option next to the Line and Paragraph spacing tool
Select “Add line space after paragraph”
New page
Avoid inserting page breaks, as they cause problems for assistive devices.
Enter text
Place cursor at the beginning of the next paragraph
Go to “Home” tab
Drop down the option next to the Paragraph section
Go to the “Line and page breaks” tab
Check the box next to “Add page break before”
-
Images can refer to photos, graphics, and diagrams (including charts and graphs).
Add Alt-text
Go to “Insert” tab
Select “Pictures”
Right-click on the image
Select “View Alt-text”
Describe or check “Mark as decorative”
Alt-text general rules
Screenreaders and assistive devices alternative text (AKA “Alt-text”) to identify components of an image. Generally, you should:
Describe in short phrases in an answer to, “What is this a picture of?”
Avoid “Picture of” or “Screenshot of” (120 character max)
Words in photo? Write out text that appears in images
Diagram? Write out Headers 1-3
-
Choose darkest background against font
Use contrast checker such as the WebAIM Contrast Checker
Ensure contrast ratio is 3:1 for large font (or 4.5 : 1 for font smaller than 18 point)
-
Before sharing make sure to conduct automatic testing using the built-in checkers
Go to “Review” tab
Select “Check accessibility”
Resolve all errors
-
Save as PDF
Go to “File” tab
Select “Save as”
Choose “Browse”
Select “PDF” under Save as file type
Select “Options” button
Check the box next to “Create bookmarks using headings”
Make your PDF accessible
-
Follow instructions to create accessible tables:
Go to “Insert” tab
Select “Table” and choose number of rows and columns by highlighting on the grid
Enter data
Go to “References” tab
Select “Insert” caption
Enter title of table, then select “OK”
Select the top row (“headers”) and right-click
Select “Table properties”
Go to “Row” tab
Check box next to “Repeat as header row at the top of each page”
Remove check from box “Allow row to break across pages” and select “OK” (after selecting entire table)
Place cursor inside first cell (A1)
Go to “Insert” tab
Select “Bookmark”
Enter “Title” and then the name of your table (use underscors instead of spaces, for example “Title_TableName”)
Right-click on table and select “Table properties”
Go to “Alt-text”
Enter description of your table
Avoid these mistakes:
Do not create using the Draw Table Tool
Do not create page layouts with tables
Do not merge or split cells
Do not control spacing with blank rows of columns (adjust line spacing instead)
Presentations
-
Setup your file with information about the document, known as “metadata.”
Go to “File” tab
Select “Info”
Add under “Title” field
-
Ensure your layout and slide title is visible to assistive devices.
Layout
DO Insert new slide
DO Go to “Home” tab
DO Select “Layout”
Avoid inserting a blank slide
Avoid inserting a Text Box
Avoid using SmartArt
Avoid Diagrams
Avoid Design Suggestions that formats text into shapes
Slide title
Format each section with built-in styles. Avoid using the bold, italics, underline, or color tools to distinguish words.
Add one Title per slide
Give each a unique title
Review (by going to “View” tab, and selecting “Outline”)
-
Styles
Use the “Normal text” style for the body section of your document. If you are borrowing from another document, try to copy and paste as text only (unformatted).
Webpages
Add links using descriptive text. This is generally the name of the webpage, and not its URL.
Write out page name
Select text
Press “Ctrl” and “K” on keyboard
Paste URL of webpage
For example, Google is a correct way to link to a website, while www.google.com is incorrect.
-
Images can refer to photos, graphics, and diagrams (including charts and graphs).
Add Alt-text
Go to “Insert” tab
Select “Pictures”
Right-click on the image
Select “View Alt-text”
Describe or check “Mark as decorative”
Alt-text general rules
Screenreaders and assistive devices alternative text (AKA “Alt-text”) to identify components of an image. Generally, you should:
Describe in short phrases in an answer to, “What is this a picture of?”
Avoid “Picture of” or “Screenshot of” (120 character max)
Words in photo? Write out text that appears in images
Diagram? Write out Headers 1-3
-
Choose darkest background against font
Go to “Home” tab, select “Designer”, and choose simple themes
Use contrast checker such as the WebAIM Contrast Checker
Ensure contrast ratio is 3:1 for large font (or 4.5 : 1 for font smaller than 18 point)
-
Before sharing make sure to conduct automatic testing using the built-in checkers
Go to “Review” tab
Select “Check accessibility”
Resolve all errors
-
Save as PDF
Go to “File” tab
Select “Save as”
Choose “Browse”
Select “PDF” under Save as file type
Make your PDF accessible
-
Go to “Review” tab
Select drop-down under Check accessibility
Select “Reading Order pane” and ensure that each placeholder is ordered in: 1) Top to bottom, 2) Left to right
Go to “View” tab
Select “Outline view” and ensure that each textbox appears in the list
Spreadsheets
-
Setup your file with information about the document, known as “metadata.”
Go to “File” tab
Select “Info”
Add under “Title” field
-
Rename each tab or worksheet to provide meaning
Go to “View” tab
Select “Page break preview”
Resize graphs to fit within page boundaries
-
Select cells containing data
Go to "Insert" tab
Select "Table"
Go to "Table Design" tab
Select table style with high color contrast (e.g., choose dark background colors against font)
Move headers to row 1
-
Images can refer to photos, graphics, and diagrams (including charts and graphs).
Graphs
Distinguish by using pattern fill, shapes, or call-outs to avoid using color-alone
Add Alt-text
Check reading order
Add Alt-text
Go to “Insert” tab
Select “Pictures”
Right-click on the image
Select “View Alt-text”
Describe or check “Mark as decorative”
Alt-text general rules
Screenreaders and assistive devices alternative text (AKA “Alt-text”) to identify components of an image. Generally, you should:
Describe in short phrases in an answer to, “What is this a picture of?”
Avoid “Picture of” or “Screenshot of” (120 character max)
Words in photo? Write out text that appears in images
Diagram? Write out Headers 1-3
-
Choose darkest background against font
Use contrast checker such as the WebAIM Contrast Checker
Ensure contrast ratio is 3:1 for large font (or 4.5 : 1 for font smaller than 18 point)
-
Before sharing make sure to conduct automatic testing using the built-in checkers
Go to “Review” tab
Select “Check accessibility”
Resolve all errors
-
Save as PDF
Go to “File” tab
Select “Save as”
Choose “Browse”
Select “PDF” under Save as file type
Make your PDF accessible
PDFs
Converting to a PDF from a source file requires additional editing, often in HTML tags. This can be quite complicated, so it’s recommended that you restrict editing of source documents, when possible (Word, PowerPoint, Excel, or HTML), or use remediation tools such as PDFix, PREP, or the UCOP PDF-Fix website.
-
Avoid the Metadata error known as, “PDF/UA identifier missing.” Program your document to incorporate the needed metadata.
For Adobe Acrobat Pro XI (or versions before 2024), you must first download the pdfUA-ID.xmp file somewhere onto your computer.
Open your PDF file
Go to “File” then “Properties”
Select “Additional Metadata”
Select “Advanced” tab (left-hand side)
Select “Append”
Locate and open the file “pdfUA-ID.xmp”
For Adobe Acrobat Pro (2024 - present versions), follow the steps below to add the PDF/UA identifier.
Open your PDF file
Go to “File” then “Properties”
Select “Advanced” tab (far right)
Change “PDF/UA Compliance” drop-down menu selection from “None” to “PDF/UA v1 - ISO 14289-1 2014”
-
Avoid the Quality error known as, “Tagged text consists of only whitespace.” Any images inserted into a Word document automatically receives an empty paragraph container after being converted to a PDF. These must be removed, or there will be tagged text consisting of only white space (“empty paragraph containers”). Depending on your version of Adobe Acrobat, you can display the tags tree window by going to the “View” tab, selecting “Show/Hide,” choosing “Navigation Panes,” and selecting “Tag.”
Go to the “Tag” tree window
Locate the <Figure> tag in your document
Locate the <P> tag that appears before the figure
Select the plus icon “+” that appears underneath the paragraph tag
Right click on the empty box
Select “Change tag to artifact”
Choose “Background” or “Pagination”
Save document
Right-click on the <P> tag
Select “Delete Tag”
Save document
-
Avoid the WCAG error known as, “Contents entry on an annotation exists, but is only comprised of white space.”
Go to the “Tag” tree window
Locate the <Link> in your document
Right-click on the <Link> tag
Select “Properties”
Enter webpage name in the alternate text field
-
Define table header columns
Go to “Reading order”
Right-click on table
Select “Table editor”
Select column headers (Press and hold “Shift” and select column headers)
Right click and select “Table cell properties”
Select header cell type
Change scope to “Column”
Define table header rows
Go to “Reading order”
Right-click on table
Select “Table editor”
Select column headers (Press and hold “Shift” and select row headers)
Right click and select “Table cell properties”
Select header cell type
Change scope to “Row”
-
Your final step is to test the document for accessibility. To do you this you should use the built-in checkers, as well as external tools.
In Adobe PDF
Go to the “Tools” menu
Run through the “Full check” under Accessibility
Save any reports for future reference
In PAC checker:
Download and install the PAC checker tool
Upload your document
Save any reports for future reference
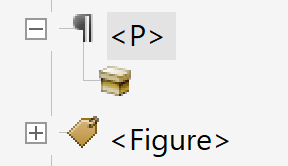
Empty tags
Paragraph symbol next to <p> tag that appears before the <figure> tag. There is a box symbol underneath the <p> tag that is empty (does not have a tag next to it).
Quick Reference
Complete these steps for creating and sharing accessible documents:
Document title. Add a Document Title
Sections
Documents
Format headers with (1) Title, Header 1s, and Headers 2-3 nested underneath
Add line spaces after paragraph (instead of pressing the “Enter” twice)
Use the built-in tools to make Tables and Graphs
Presentations
Format slides so there is a layout that uses content placeholders, and (2) slide title
Check for reading order
Links. Add links to webpages using descriptive text (e.g., “Ctrl” and “K”)
Images. Add Alt-text to all images/graphics, tables, and graphs
Color. Check for color-contrast using tools such as the WebAIM Contrast Checker (ensuring 3:1 ratio for large font)
Testing. Conduct automatic testing for accessibility using the built-in Accessibility Checker
PDF version. Prepare your PDF (bookmarks, metadata, tags, links)
Save as PDF
Add metadata using the pdfUA-ID.xmp file or toggle drop-down menu to “PDF/UA v1 - ISO 14829-1 2014”
Remove empty paragraph <P> tags before Figures (“images”) (Microsoft Word only)
Update webpage links with alt-text (Microsoft Word only)
Test for accessibility in Adobe PDF and using the PAC checker tool